
| 일 | 월 | 화 | 수 | 목 | 금 | 토 |
|---|---|---|---|---|---|---|
| 1 | ||||||
| 2 | 3 | 4 | 5 | 6 | 7 | 8 |
| 9 | 10 | 11 | 12 | 13 | 14 | 15 |
| 16 | 17 | 18 | 19 | 20 | 21 | 22 |
| 23 | 24 | 25 | 26 | 27 | 28 |
Tags
- 2 > /dev/null
- WeNews
- 네이티브쿼리
- foreignkey
- 테스트메소드
- docker명령어
- 예약
- appspec
- AuthenticationEntryPoint
- 메소드명
- MySQL
- 검색
- 참조키
- 테스트
- 컨테이너실행
- 커밋메세지수정
- ㅔㄴ션
- 추후정리
- 포트
- application.yml
- querydsl
- 외부키
- subquery
- 서브쿼리
- Query
- EC2
- ubuntu
- 메세지수정
- 적용우선순위
- appspec.yml
Archives
- Today
- Total
제뉴어리의 모든것
MapStruct 사용법 본문
MapStruct는 DTO 와 Entity간 자동으로 맵핑을 해주는 라이브러리이다.
다음 순서대로 진행하여 적용해보자.
0. 맵핑할 Entity와 DTO 정의
- Entity
import lombok.Setter;

@Setter // MapStruct에서 구현체내에 메소드 바디를 정의할때 사용되기 때문에 필수
public class Student1 {

    Long id;

    String name;

    String phone;

}
- DTO
import lombok.Getter;
import lombok.Setter;

@Getter // MapStruct가 Entity와 매핑하기 위해 필수
@Setter // 스프링이 클라이언트가 보낸 Json 데이터를 해당 DTO에 매핑하기 위해 필수
public class Student1PostDto {

    String name;

    String phone;
}
1. build gradle
dependencies {
	...
	...
	implementation 'org.mapstruct:mapstruct:1.4.2.Final'
	annotationProcessor 'org.mapstruct:mapstruct-processor:1.4.2.Final'
}
2. 인터페이스 정의
import com.practice.example.student.dto.Student1PostDto;
import com.practice.example.student.dto.Student1ResponseDto;
import com.practice.example.student.entity.Student1;
import org.mapstruct.Mapper;


@Mapper(componentModel = "spring")  // MapStruct에게 매퍼 인터페이스임을 알림.
public interface Student1Mapper {

	//매핑할 메소드 선언
    Student1 student1PostDtoToStudent1(Student1PostDto student1PostDto); // DTO -> Entity
    Student1ResponseDto student1ToStudent1ResponseDto(Student1 student1); // Entity -> DTO
}
3. 해당 인터페이스 DI
import com.practice.example.student.dto.Student1PostDto;
import com.practice.example.student.entity.Student1;
import com.practice.example.student.mapper.Student1Mapper;
import lombok.RequiredArgsConstructor;
import lombok.extern.slf4j.Slf4j;
import org.springframework.http.HttpStatus;
import org.springframework.http.ResponseEntity;
import org.springframework.web.bind.annotation.*;


@Slf4j
@RestController //리턴 값을 데이터 자체로 보내기위해, (JSON으로 변환된다)
@RequestMapping("/v1/student")
@RequiredArgsConstructor //상수 멤버변수 초기화 생성자 자동 생성
public class StudentController {

    final Student1Mapper student1Mapper; // 정의한 매퍼 인터페이스의 의존성 주입

    @PostMapping
    public ResponseEntity postStudent(@RequestBody Student1PostDto student1PostDto) {

        Student1 student1 = student1Mapper.student1PostDtoToStudent1(student1PostDto); //매퍼 사용

        System.out.println(student1);

        return new ResponseEntity(HttpStatus.OK);
    }


}
위와 같이 정의한 매퍼인터페이스를 의존성 받아서 사용하면 된다.
그렇다면 구현체는 어디있나라고 할 수가 있다.
MapStruct는 구현체를 빌드시에 생성한다.
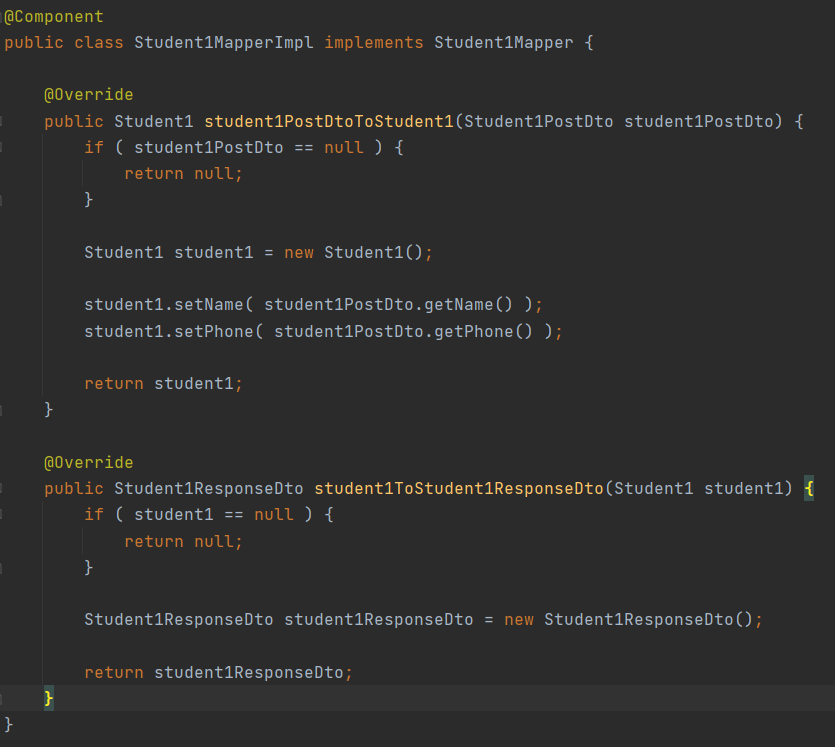
그래서 앱을 구동시켜 보면 아래와 같이 구현체가 만들어진것을 확인할 수 있다

그리고 만들어진 구현체를 보면 아래와 같이 @Component 가 붙어서 빈으로 등록되기 때문에 의존성 주입또한 받을 수 있다.
'Spring Boot' 카테고리의 다른 글
| SpringBoot Test에서 현재 등록된 빈 조회하기 (어떤 환경에서든지 가능) (0) | 2022.09.13 |
|---|---|
| 테스트시 사용되는 각종 애노테이션 (0) | 2022.09.13 |
| 커스텀 애노테이션 만들어서 DTO 유효성 검증하기 (0) | 2022.09.10 |
| Junit테스트에서 설정한 @DisplayName이 Console창에 나타나지 않을때 (0) | 2022.09.07 |
| object references an unsaved transient instance - save the transient instance before flushing 에러 (1) | 2022.09.03 |
'Spring Boot' Related Articles
more

